
🎨 定制组件
当平台组件库无法满足需求时,可加载主前端 Vue 组件,也可把 MicroService 指定路由嵌入表单。
📌 前言
- 在实际表单开发中,低代码组件库无法覆盖全部复杂交互。
- Microi吾码的
DevComponent同时支持主前端本地 Vue 组件和已发布 MicroService 路由。 - 通用、平台级组件可以进入
Microi.Client;租户专属或需要独立迭代的复杂区域优先使用 MicroService,避免每次修改都重新发布主前端。
🧭 先选择交付方式
| 场景 | 推荐方式 | 发布边界 |
|---|---|---|
| 多租户共用、与主框架强耦合的基础控件 | 本地 Vue 定制组件 | 随 Microi.Client 编译发布 |
| 租户专属看板、联动工作区、复杂选择器 | DevComponent + MicroService 路由 | 微服务独立构建、发布与回滚 |
| 需要临时弹出而非固定占据表单位置 | V8.OpenAppDialog | 微服务以 Dialog / Drawer 打开 |
表单嵌入不是手写 iframe
平台会复用当前登录态、租户以及菜单/模块/表权限上下文,并把可序列化表单数据传给子应用。完整配置、自动高度和字段值回写协议参见微服务:在表单引擎中引用。
📸 示例一(定制组件)
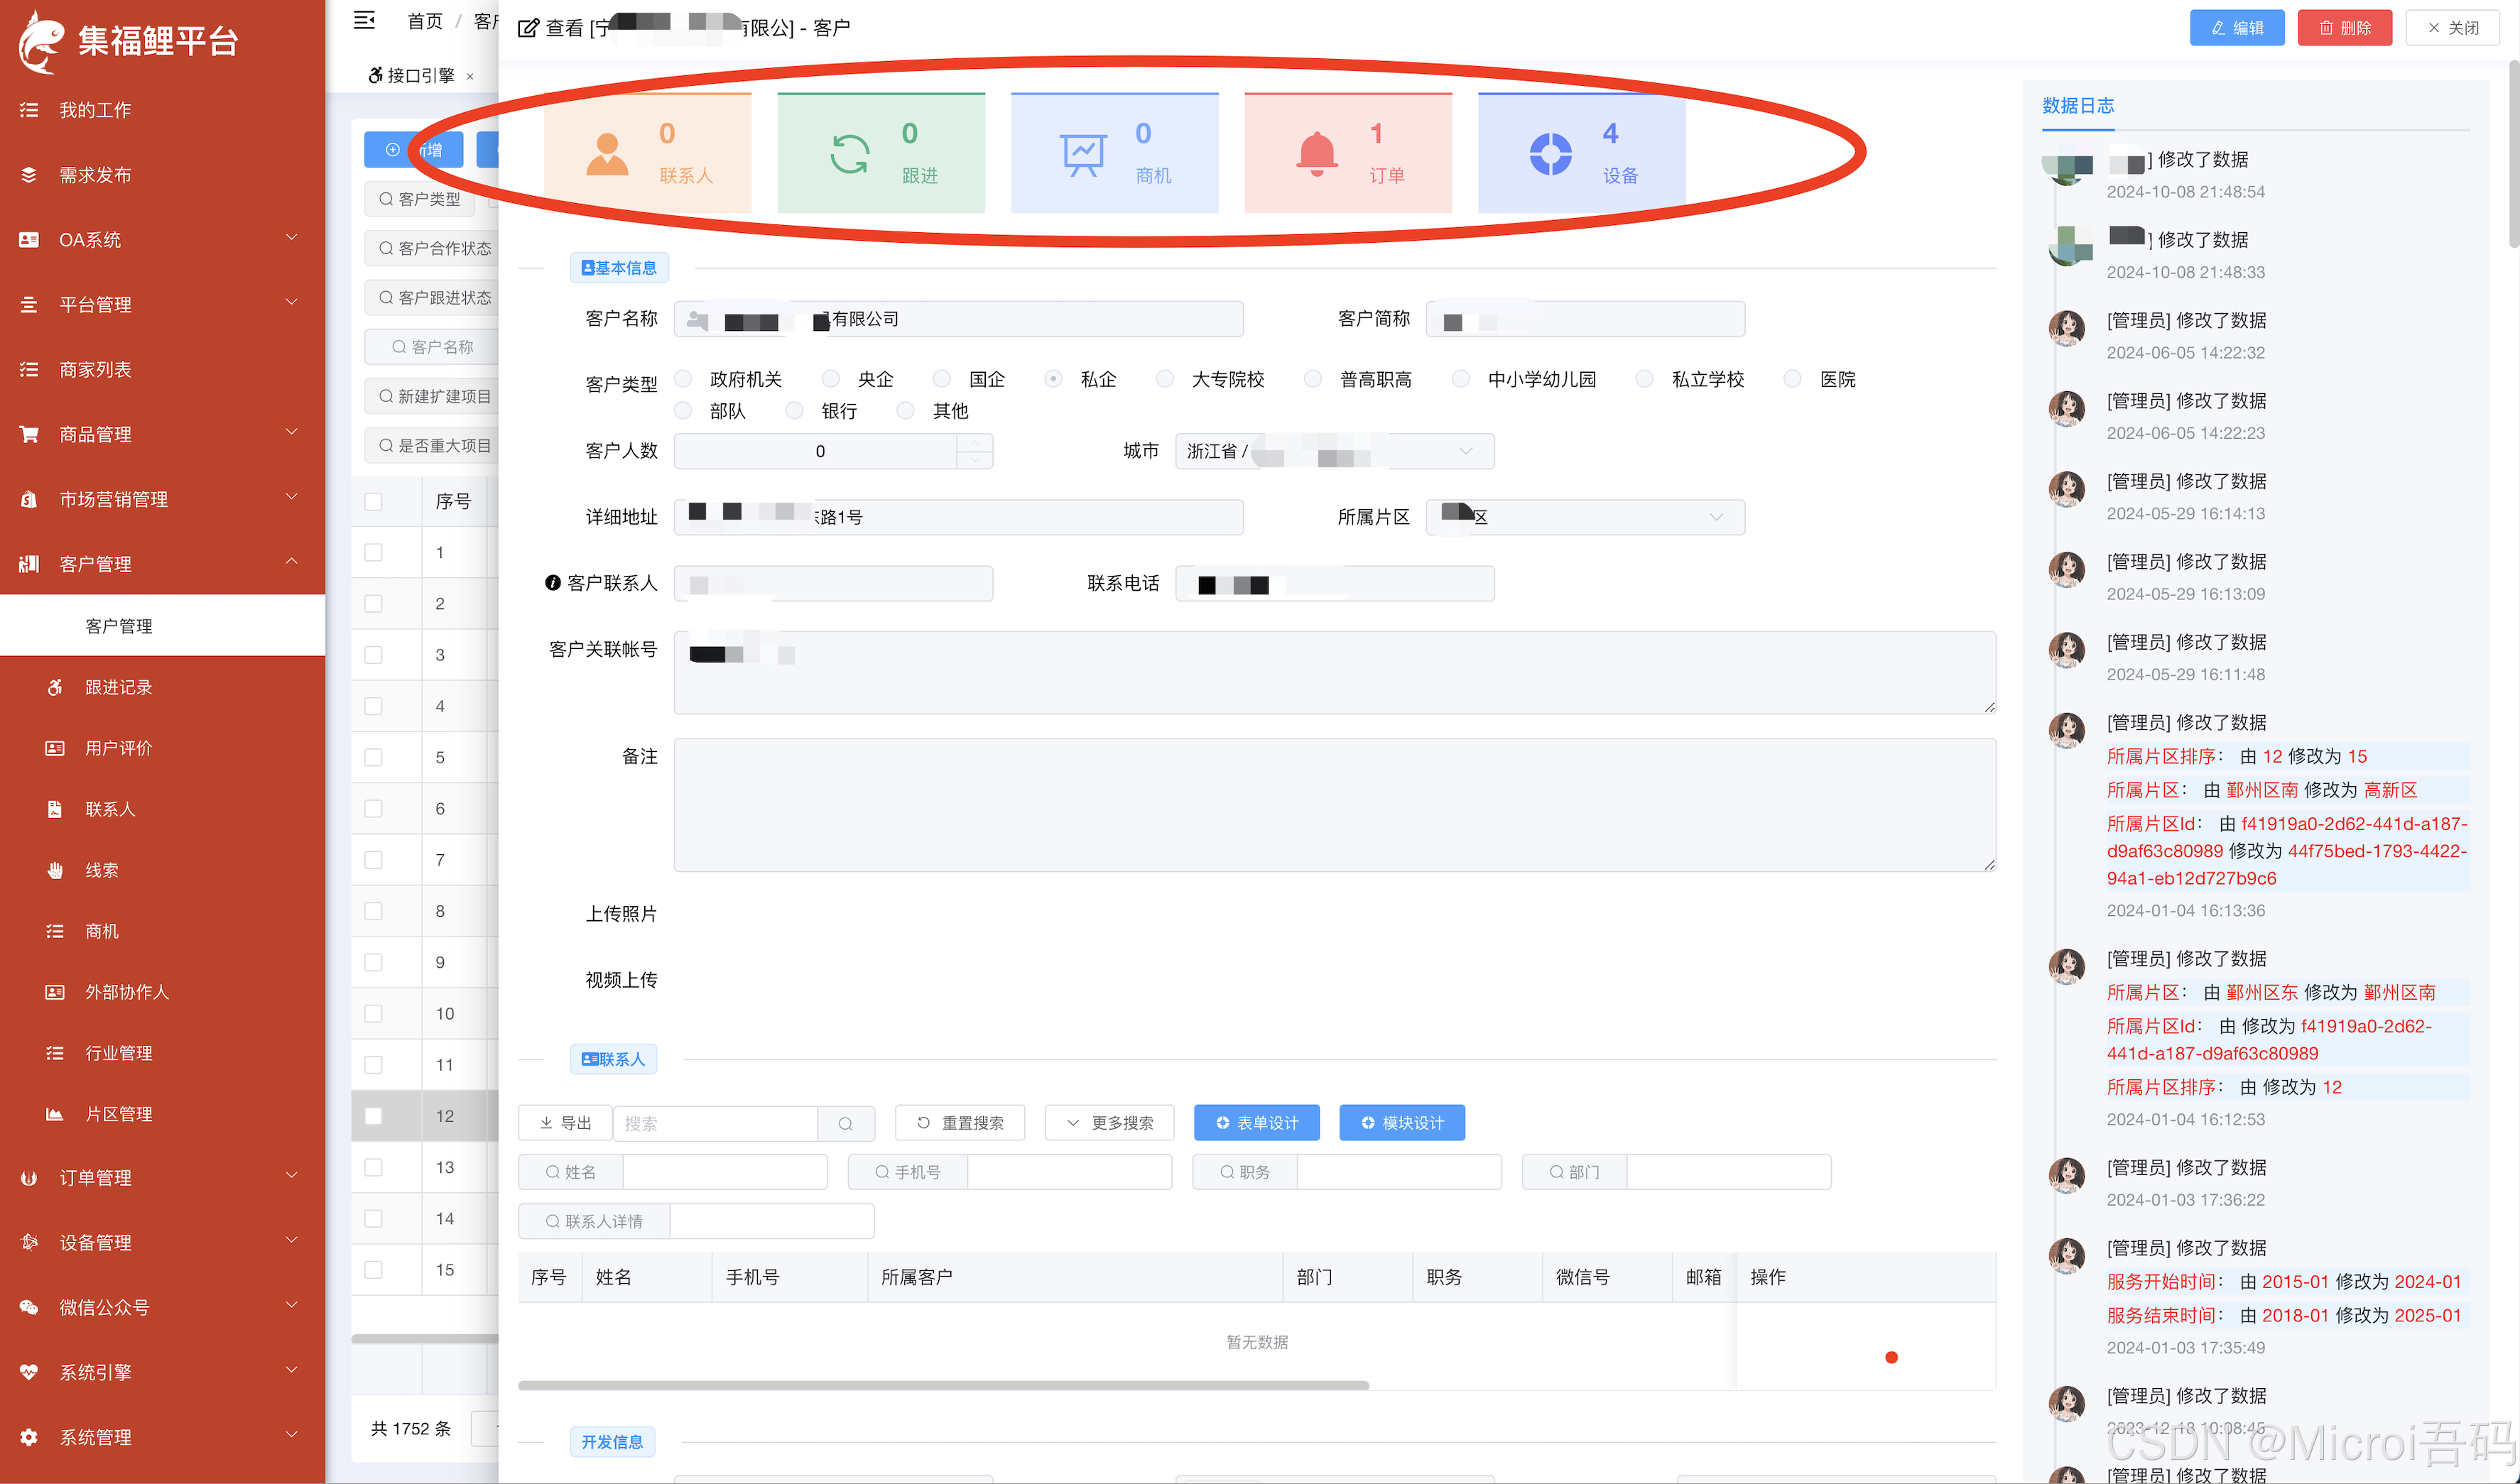
客户需求:在客户详情顶部显示数据统计,点击每个统计后自动滚动到对应子表位置:
📸 示例二(定制组件)
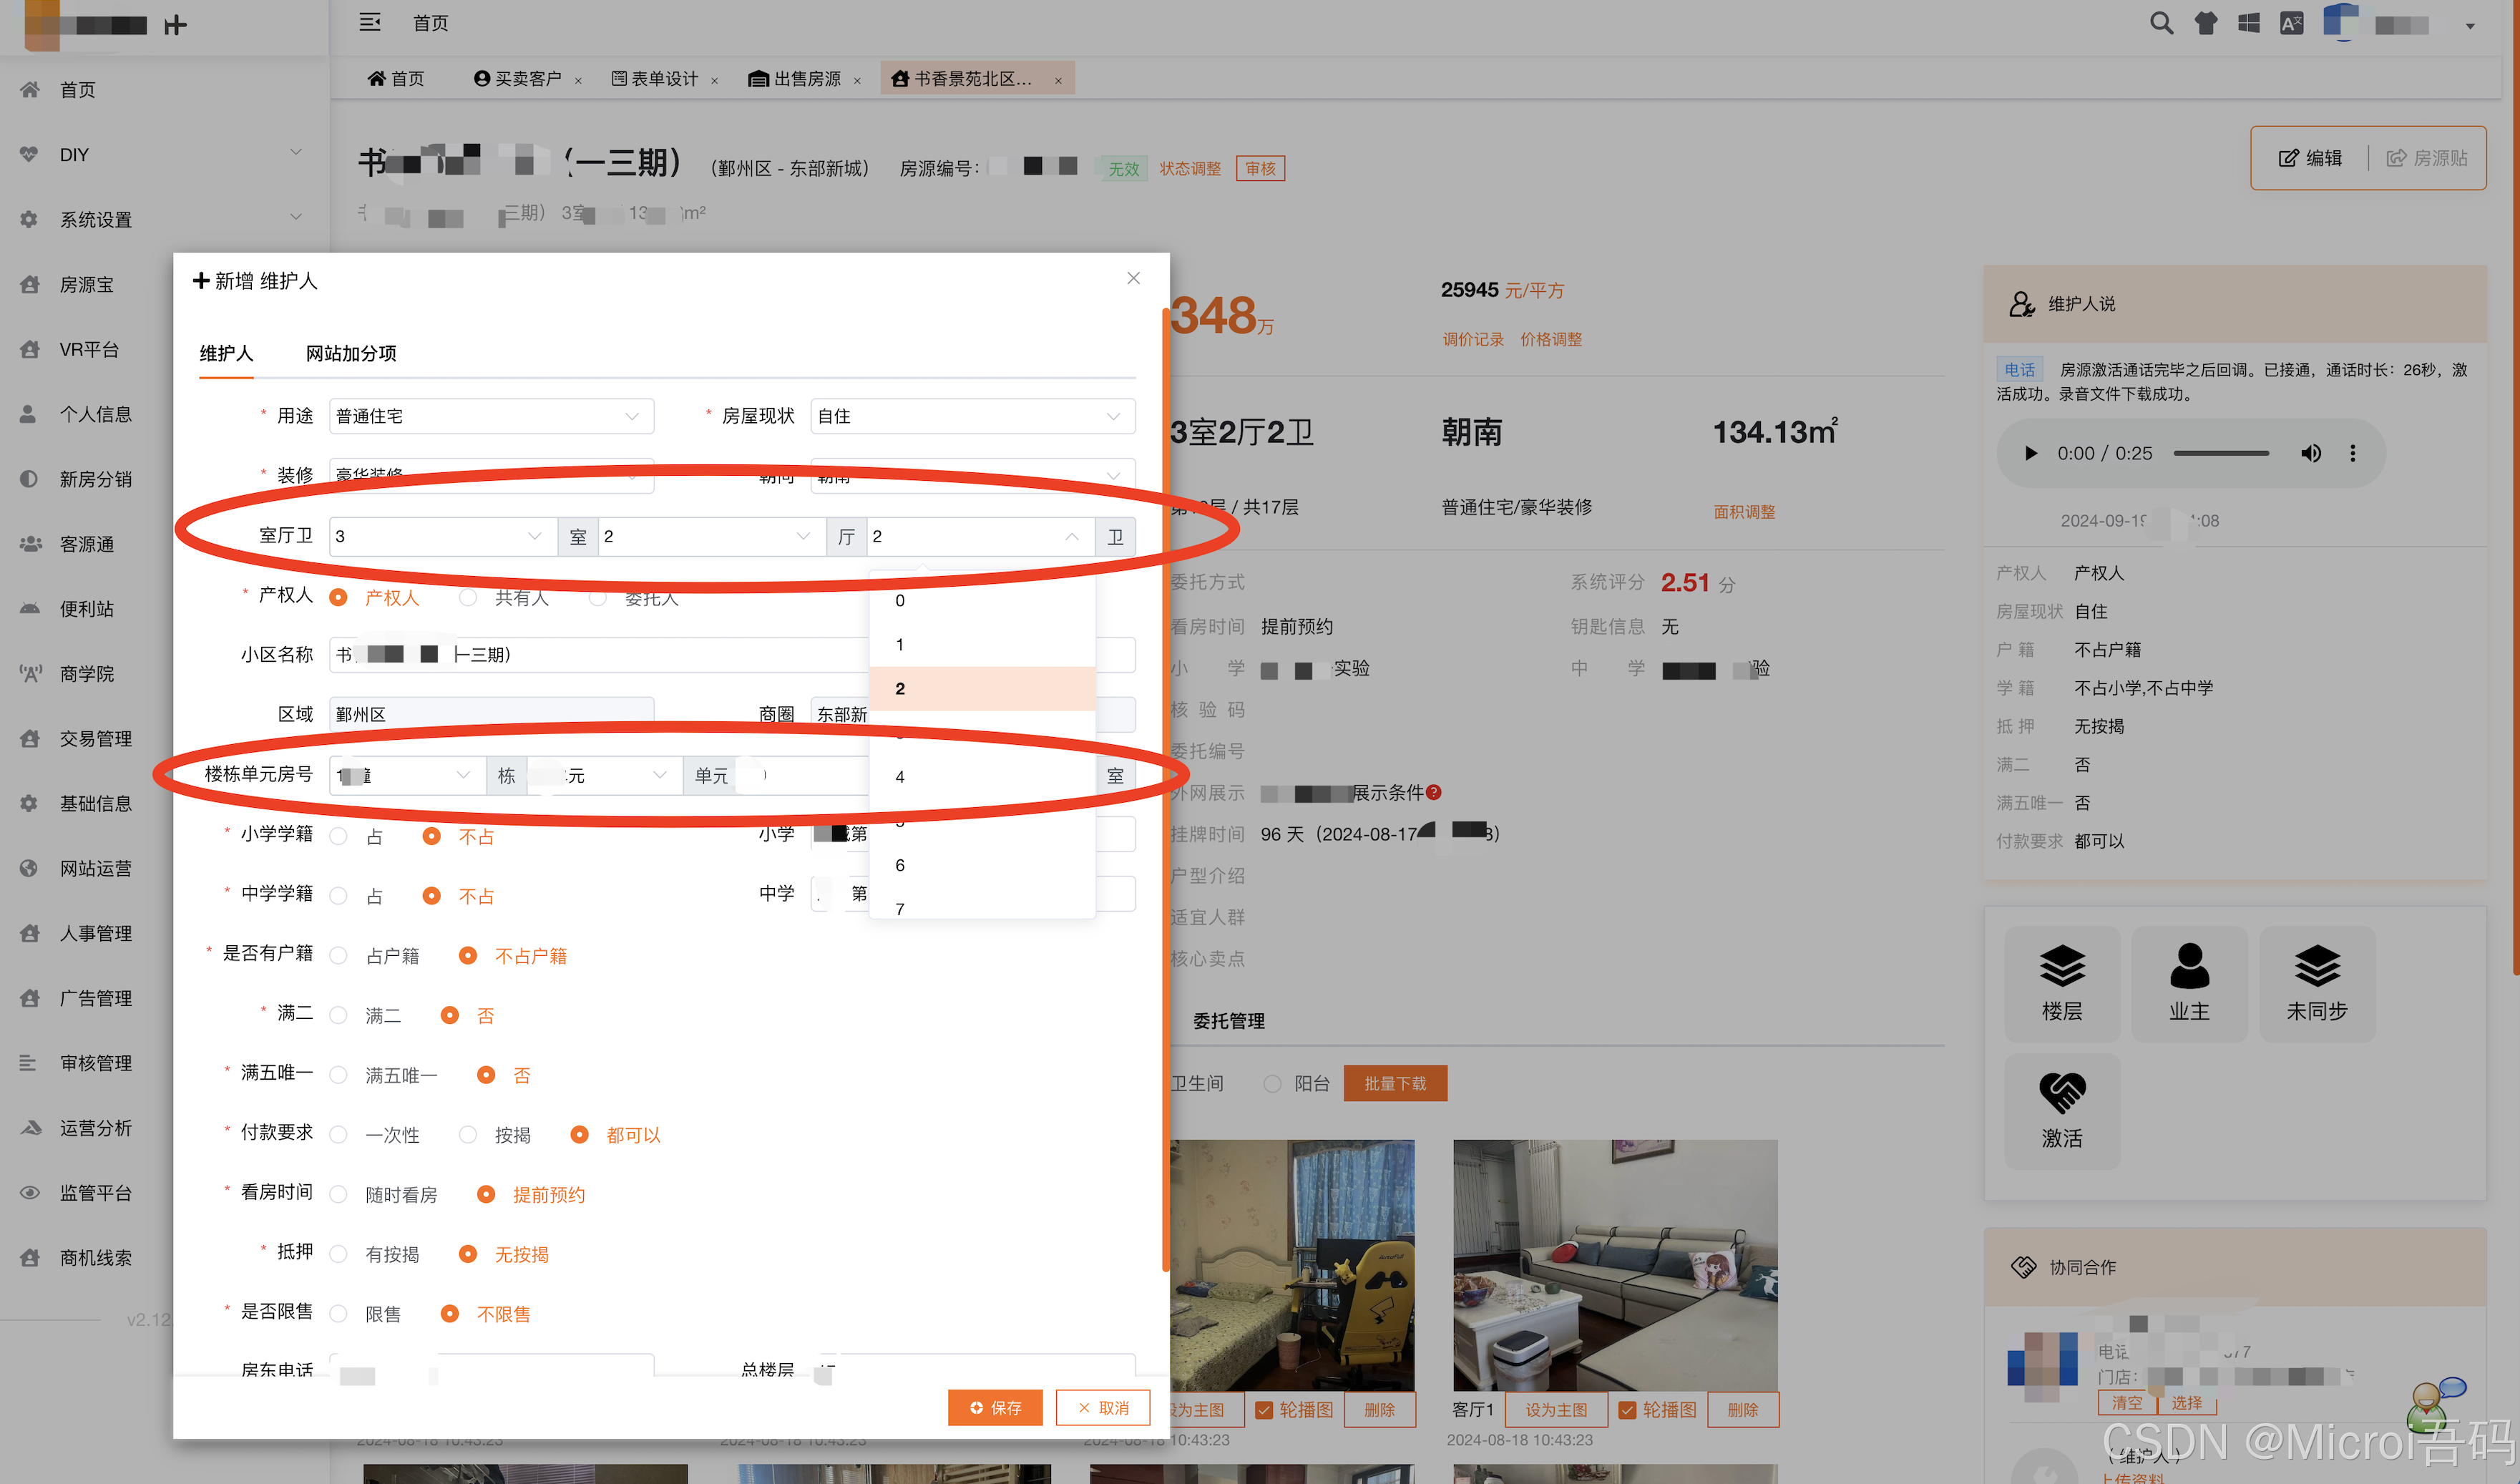
房源信息有两个特殊组件:
- 选择几室几厅几卫
- 选择小区后获取楼栋 → 选择楼栋后获取单元 → 选择单元后获取房号
方式一:加载主前端 Vue 组件
1、到 Microi吾码框架源码中创建定制 Vue 组件
如:
/src/views/custom/demo/components/customer-childtable.vue
展开查看 JavaScript 代码(160 行)
<template>
    <div class="microi-customer-childtable">
        <div class="item" style="
                color: rgb(255, 163, 96);
                background: rgba(255, 163, 96, 0.2);
                border-top: 2px solid rgb(255, 163, 96);
            " @click="scrollIntoView('.field_LianxiRLine')">
            <i class="el-icon-s-custom"></i>
            <div class="info">
                <p>
                    <strong>{{ ReportData.LianxirenCount }}</strong>
                </p>
                <p>联系人</p>
            </div>
        </div>
        <div class="item" style="
                color: rgb(65, 181, 132);
                background: rgba(65, 181, 132, 0.2);
                border-top: 2px solid rgb(65, 181, 132);
            " @click="scrollIntoView('.field_GenjinJLLine')">
            <i class="el-icon-refresh"></i>
            <div class="info">
                <p>
                    <strong>{{ ReportData.GenjinCount }}</strong>
                </p>
                <p>跟进</p>
            </div>
        </div>
        <div class="item" style="
                color: rgb(113, 166, 255);
                background: rgba(113, 166, 255, 0.2);
                border-top: 2px solid rgb(113, 166, 255);
            " @click="scrollIntoView('.field_ShangjiLine')">
            <i class="el-icon-data-line"></i>
            <div class="info">
                <p>
                    <strong>{{ ReportData.ShangjiCount }}</strong>
                </p>
                <p>商机</p>
            </div>
        </div>
        <div class="item" style="
                color: rgb(255, 113, 113);
                background: rgba(255, 113, 113, 0.2);
                border-top: 2px solid rgb(255, 113, 113);
            " @click="scrollIntoView('.field_DingdanLB')">
            <i class="el-icon-message-solid"></i>
            <div class="info">
                <p>
                    <strong>{{ ReportData.DingdanCount }}</strong>
                </p>
                <p>订单</p>
            </div>
        </div>
        <div class="item" style="
                color: rgb(96, 130, 255);
                background: rgba(96, 130, 255, 0.2);
                border-top: 2px solid rgb(96, 130, 255);
            " @click="scrollIntoView('.field_Shebei')">
            <i class="el-icon-s-help"></i>
            <div class="info">
                <p>
                    <strong>{{ ReportData.ShebeiCount }}</strong>
                </p>
                <p>设备</p>
            </div>
        </div>
    </div>
</template>

<script>
export default {
    name: "loudong",
    props: {
        /**
         * 固定接收数据的对象,由V8代码传过来
         */
        DataAppend: {
            type: Object,
            default: () => { },
        },
    },
    watch: {
        //监听数据变化,切换小区时要重新获取楼栋,其它信息置空
        DataAppend: function (newVal, oldVal) {
            var self = this;
            self.KehuClassReport();
        },
    },
    data() {
        return {
            ReportData: {
                LianxirenCount: "...",
                GenjinCount: "...",
                ShangjiCount: "...",
                ShebeiCount: "...",
                DingdanCount: "...",
            },
        };
    },
    mounted() {
        var self = this;
        self.KehuClassReport();
    },
    methods: {
        KehuClassReport() {
            var self = this;
            if (self.DataAppend.KehuID) {
                self.Microi.DataSourceEngine.Run(
                    "kehu_childtable_report",
                    {
                        Id: self.DataAppend.KehuID,
                    },
                    function (result) {
                        if (self.Microi.CheckResult(result)) {
                            self.ReportData = result.Data;
                        }
                    }
                );
            }
        },
        scrollIntoView(traget) {
            const tragetElem = document.querySelector(traget);
            const tragetElemPostition = tragetElem.offsetTop;
            // 判断是否支持新特性
            if (
                typeof window.getComputedStyle(document.body).scrollBehavior ==
                "undefined"
            ) {
                // 当前滚动高度
                let scrollTop =
                    document.documentElement.scrollTop ||
                    document.body.scrollTop;
                // 滚动step方法
                const step = function () {
                    // 距离目标滚动距离
                    let distance = tragetElemPostition - scrollTop;

                    // 目标需要滚动的距离,也就是只走全部距离的五分之一
                    scrollTop = scrollTop + distance / 5;
                    if (Math.abs(distance) < 1) {
                        window.scrollTo(0, tragetElemPostition);
                    } else {
                        window.scrollTo(0, scrollTop);
                        setTimeout(step, 20);
                    }
                };
                step();
            } else {
                tragetElem.scrollIntoView({
                    behavior: "smooth",
                    inline: "nearest",
                });
            }
        },
    },
};
</script>
<style lang="scss">
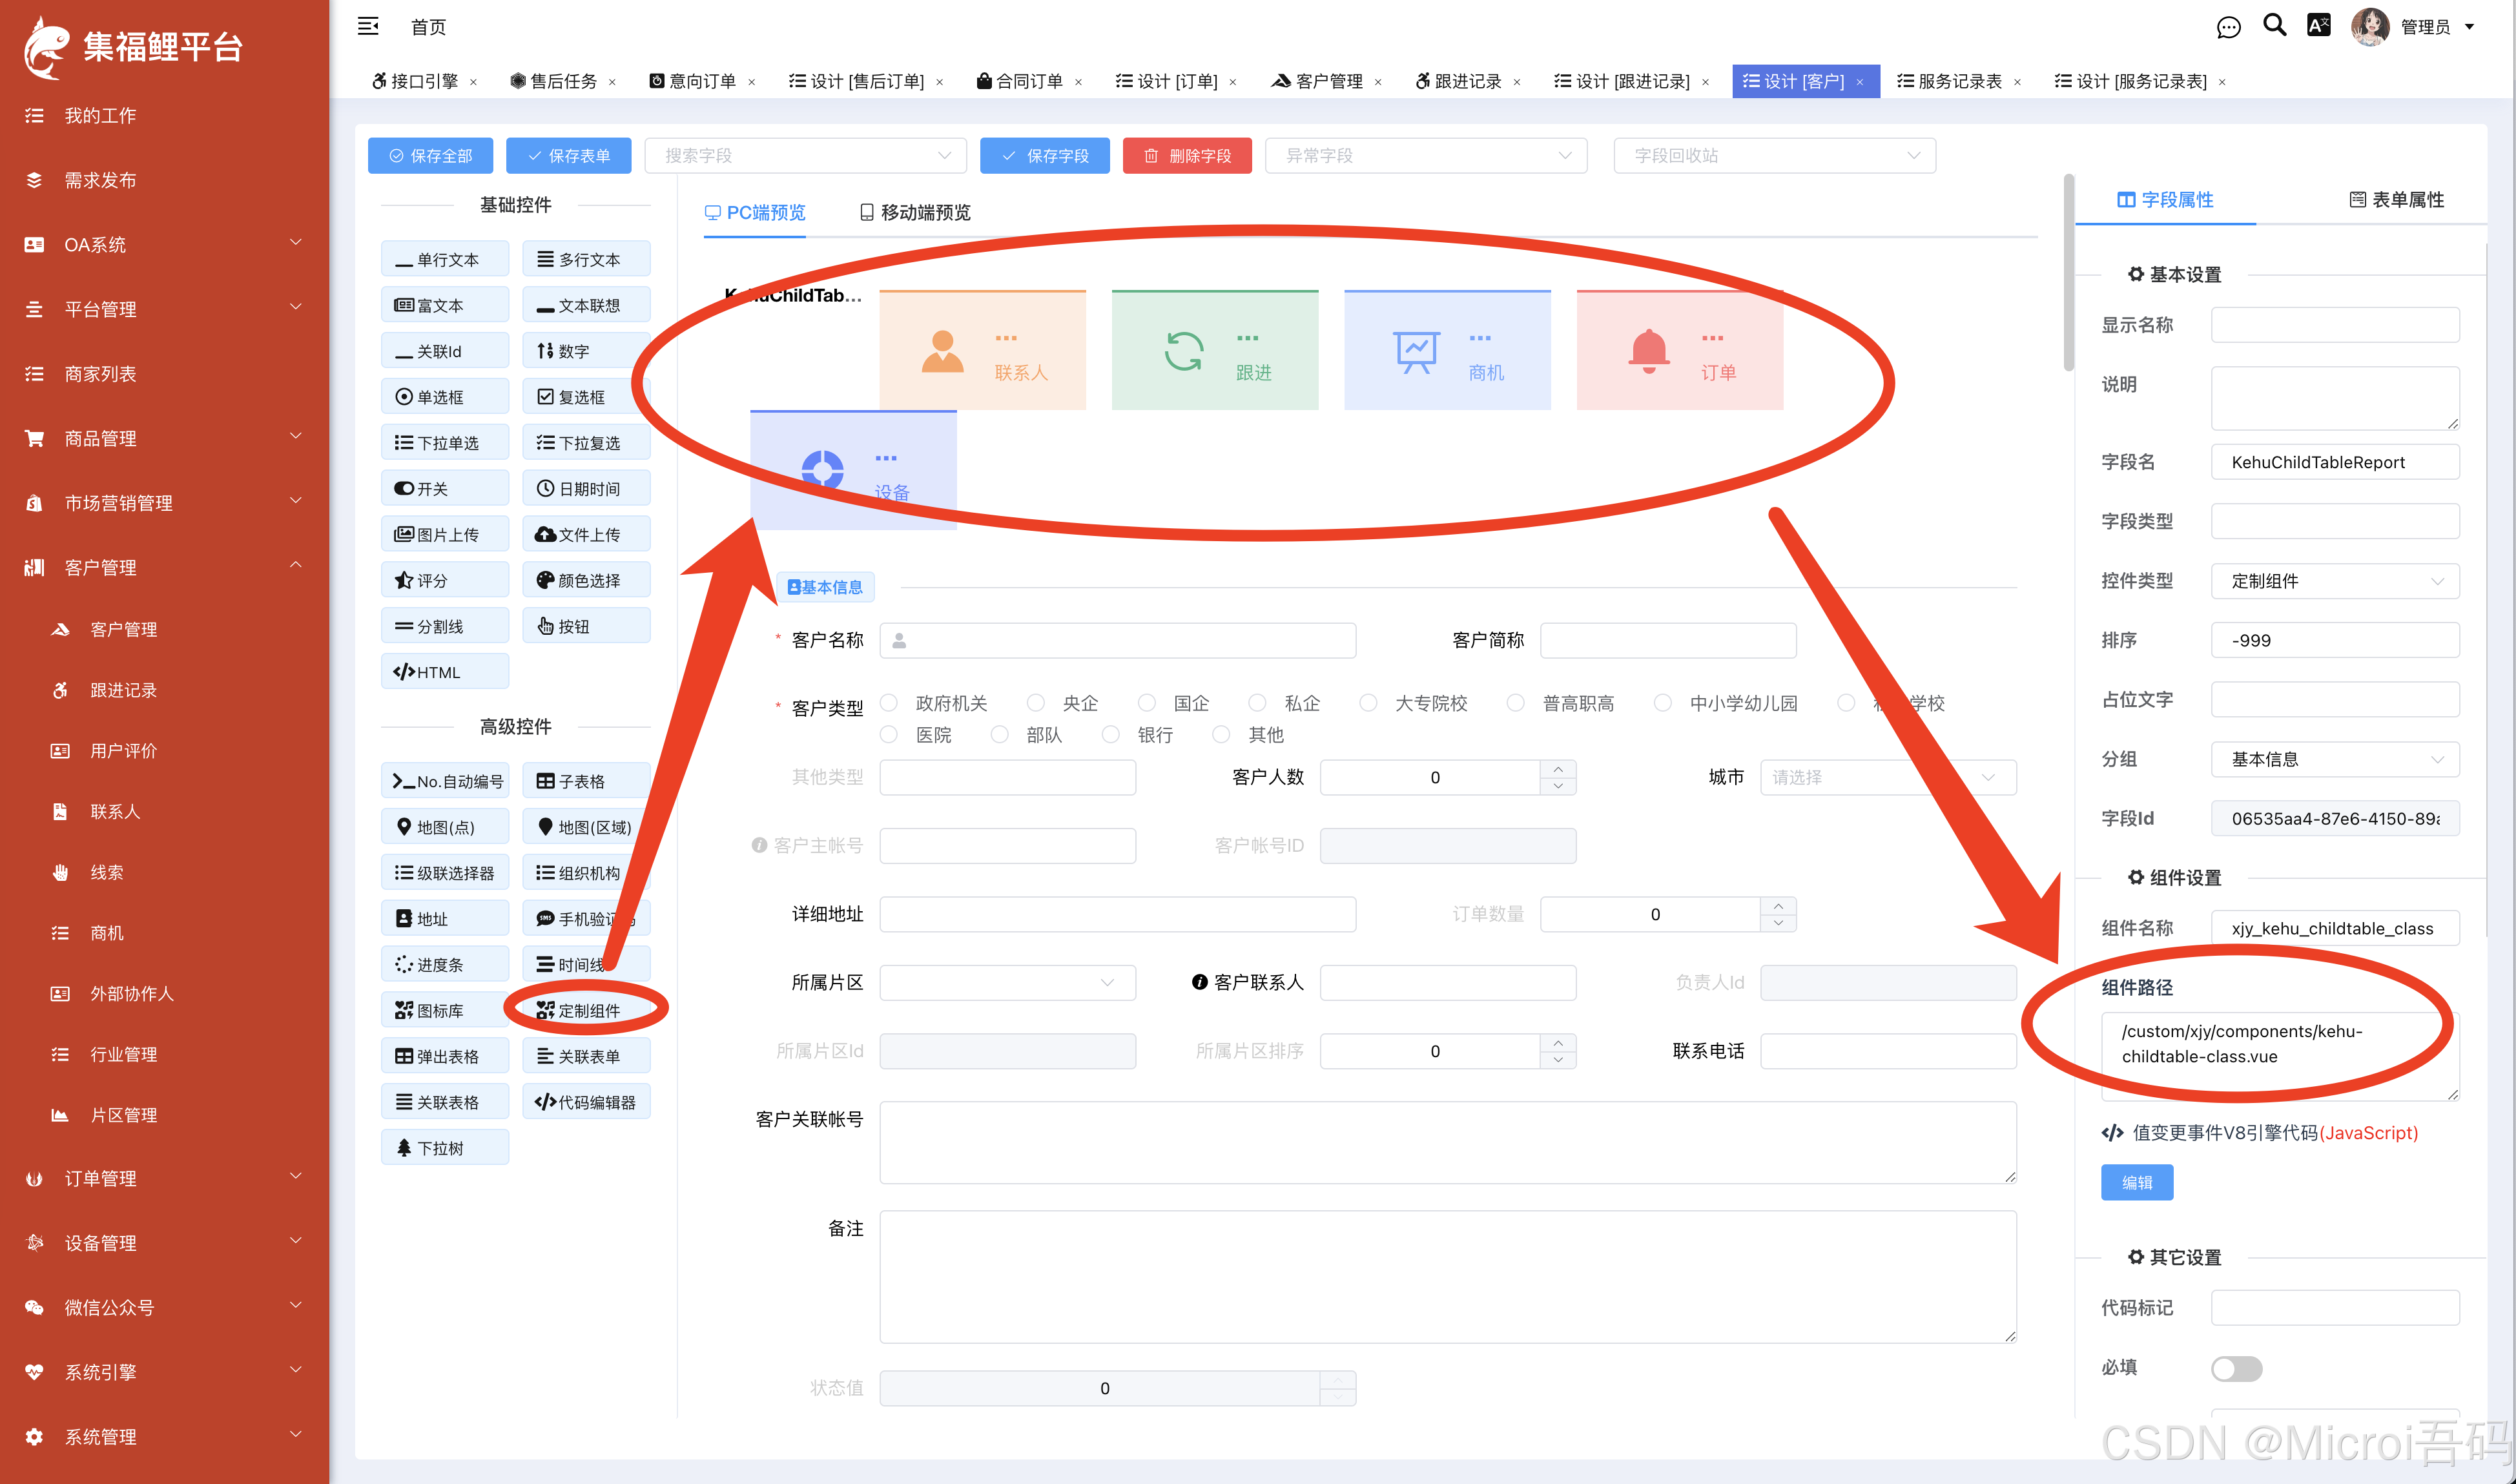
</style>2、表单设计拖入一个【定制组件】并填写组件路径
3、发布前端项目
本地 Vue 文件会随 Microi.Client 主包发布。同一路径存在本地组件时,本地组件优先加载。
方式二:加载 MicroService 指定路由
- 在
microi.routes.json的目标页面声明唯一的LegacyComponentPaths别名。 - 构建并发布微服务,确认对应
sys_microiservice_page已启用。 - 在表单设计器拖入“定制组件”,让
DevComponentPath与该别名一致。 - 子应用通过
window.microApp.getData()获取componentData与permissionContext,通过dev-component:resize同步高度、通过dev-component:event回写字段值。
{
  "Component": "DevComponent",
  "FormWidth": 24,
  "Config": {
    "DevComponentName": "QualityInspectionMicroApp",
    "DevComponentPath": "/micro-app-components/quality-inspection-board"
  }
}当主前端找不到该路径的本地 Vue 文件时,平台会用 LegacyComponentPaths 找到已发布微服务页面,并加载它的 RoutePath。详细路由清单与通信示例见微服务(前端微应用)。
查看组件实际来源
“定制组件”是表单控件类型,不代表一定加载主前端的本地文件。选中字段后,设计器右侧的“组件来源”会显示组件名称、兼容路径,以及解析后的微服务应用、AppKey、页面路由、PageKey、运行版本和源码工程位置;字段设置弹窗也显示相同信息。
运行表单中点击右上角“微服务”可查看入口和当前租户坐标,并复制包含真实 AppKey、路由、兼容路径的 AI 修改指令。来源信息缺失或读取失败不阻断原有业务组件;旧路由清单没有声明 SourceFile 时只定位到应用工程,不猜测源码文件名。微服务的稳定入口版本以当前发布运行记录为准,而不是旧页面行上残留的构建号。
新旧前端共用数据库时,应保留 DevComponentPath,通过微服务路由的 LegacyComponentPaths 做兼容映射。不要为了让新版显示“微服务”,把控件类型或旧组件路径改掉。